Pages

Sunday, December 9, 2012

String or Yarn Star Christmas Ornaments

Allow me to begin by saying that my mom is a fantastic teacher. When I was younger, I would visit her classroom as often as I could to help out. Later, she became a librarian and I would read stories for the kids (in very badly done accents, but the kids were impressed). One of my favorite activities was, of course, when we did crafts with the kids. Today I'm going to share with you one of the crafts that we did.

This craft has MANY variations, so if the first set of instructions don't include what you might have on hand, keep scrolling to the other versions.

Yarn Star Ornaments

What You'll Need:

  • Cardboard (we used a pizza box)
  • Wax Paper (recommended, but optional)
  • Yarn
  • Craft or School Glue
  • Thumbtacks

1. Draw a star shape on your cardboard. 

I've found a simple 5-point star or Star of David (2 triangles) somewhere in the range of 3-6" across work best. You can try a 7- or 8-point star, but they are more complex. Or if you have a cool hexagon-shaped trivet, you can trace that as well to make a Star of David.
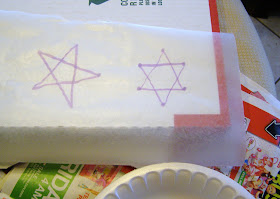
2.  Lay a piece of wax paper over the design. 

The wax paper will prevent the star from sticking to the cardboard and can be used to catch glitter if you decide to go that route.

3. Stick a thumbtack in each corner of your design. 

My 6-year-old thought this step was pretty cool. She felt rather grown up. 


4. Loosely measure your yarn to the correct size. 

To do this, place the yarn over the design and cut long enough so there is a couple inches excess. (Weird camera angle, I promise she didn't cut herself!).

5. Soak the yarn in glue. 

For this project, we used Aleene's Craft Glue. We tried watering it down, but it made the ornaments too flexible. Our second attempt, with undiluted glue, turned out much better.


6. Once the yarn is saturated, stretch it around your star shape. 

Stretch the yarn so it is taut, but not so tight that your thumbtacks are pulled out of place. For added strength, weave the yarn in an over-under pattern as you string it along. You may tie the yarn or simply twist it into place. This part is messy!

7. Allow to dry at least overnight.


Variation 1 

No cardboard or pushpins? Not to worry, you can use foam plates and toothpicks instead!


Variation 2

Brads also work instead of toothpicks and pushpins.


Variation 3 

Add glitter just before step 7.


Variation 4 

Want stars of different colors and textures? Either use different colors and weights of yarn or use plain cotton string and add tempera paint to your glue in step 5.


Variation 5

Try an 8-point star or more! I will probably try to make another one at some point, but I made mine with diluted glue and it failed-miserably. I'm not too proud to show you, either! May you have better success with it!


If I remember correctly, the project my mom's class did used bluing and liquid starch. If anyone knows that variation, please let me know!


Photo Limits

Well, here's another weird post. I suppose since a lot of my posts are about trial and error, I thought I'd share with you my trial and error experience on posting. You won't have to read my blog very long to find out how much I love pictures, especially big, colorful, megabyte-crunching ones. When trying to post my latest entry on Christmas ornaments I ran into a little problem- I've filled up my photo storage allotment!

Faced with the choices of paying for storage (which is all well and fine, but I'm not quite ready to go that route yet), deleting old photos (which means they get removed from my posts), posting without photos (not really an option, is it?), or signing up for a free online photo service, I chose the online service. We'll see how it goes and hopefully bring you my String Star Ornaments very soon!

Friday, December 7, 2012

Doctor Who Snowflakes

Christmas is finally looking like it might be welcome at my house. The school duties are slowing as the semester draws to a close (not a moment too soon!), which is giving me a little time to decorate. Please don't misunderstand, I don't NEED the decorations for Christmas to be considered a success. However, I love to decorate for Christmas and the fact that this year I was too overworked to care was an indicator that I needed to take a couple days off, relax, and do a craft project to unwind. So while the kindergartener was working on something for her school, I sat down and dug out the Doctor Who Snowflake patterns I've been saving for a long time now.

If you're interested in making a set of your own, here's where I got them: Oodly Crafting
You might need to fold them a bit off-center since I believe these were made for A4, which is similar to, but not quite, letter size.


Just for fun, we made some other snowflakes as well. I made up a couple Batman patterns, but I'm not too happy with them just now. I'll keep working at them and post a template eventually, if I get another spare moment.

And finally, my word of the day (yesterday was grumbletonian) is nerdflakes. Here are some nerdflake sites I found and hopefully will be adding to my snowflake collection soon:

Doctor Who, Star Wars, Galactica Snowflakes
TARDIS and Weeping Angels Flake
Sonic Screwdriver Flake

Let me know if you try any of these and how they turned out! I wasn't pleased with my Oods, so they didn't get a close-up. By the way, you will probably need some very sharp scissors, an X-acto knife, and a cutting board. Also lots of patience! Enjoy!


UPDATE: We've added a few more flakes and I've done some nerdflakes of my own now.  I can add a template upon request, but I don't have one yet. And without further ado: NERDFLAKES!!


Star Trek


 Rebel Alliance

(By the way, I did a Rebel Alliance logo in cross-stitch last year for a stocking topper. I might be persuaded to post the pattern.)

Adipose

Weeping Angels

Wednesday, December 5, 2012

Making a Rustic Wisteria Trellis

Our latest project has been a rustic trellis for the wisteria in the front yard. After researching various sources and drawing inspiration from Pinterest, we collaborated to make this project.

Collaborated is such a neat and simple word, but it really doesn't capture the amount of combined thinking we did on this. First, my husband is a fan of clean lines and simple modern looks, with a farm-like rustic quality. I like ornate antiques and dark woods. Combine that with the style of our house (think suburbs with siding, white trim, shingle roof), our modest budget, and the poor trellis that has been already taken over by the vines, and you have quite the task. So, without further ado (if you want more "ado" check out my wisteria post here.)

Making a Rustic Wisteria Trellis

What You'll Need:

  • 2 - 4"x4"x8' pressure-treated wooden posts
  • 1 qt. dark walnut stain (optional)
  • 1 25' roll rabbit fence (ours is wire, the widest holes are 2" x 4")
  • staples
  • u-nails
  • 1 bag concrete

1. Check and Measure. 

The first step is always to check with your local digging hotline to make sure you aren't going to burst a pipe or hit a power line.

Second, measure where you want your posts to be. Ours are about 12 feet apart, I wouldn't recommend any wider than that because it will be difficult to tighten the fence.

2. Stain the Posts (Optional). 

We had originally intended to leave the posts as-is, but they looked very green against our tan siding. We decided to go for a dark walnut stain and I'm quite pleased with the results.


3. Dig the Holes

We  My husband dug the holes about 2 feet deep. Word of advice if you get into some tough clay: fill the hole with water and allow to soak overnight. My husband actually bent our post-hole digger on this project.

Also, you might look into buying a digging bar, but that requires quite a bit of muscle. If all else fails, you can rent an auger, just be careful if you're in close proximity to your house. (Our project was way too close to the house to consider this option.)


4. Mix the Concrete and Install the First Post. 

Being rather old-fashioned and cheap in terms of construction methods, my husband mixed our concrete by hand.  The concrete adds stability to the posts.

When thoroughly mixed, pour a little concrete into the first hole. Set the first post in the hole and use a level to ensure it is straight. If necessary, use a sledgehammer to drive the post into the concrete. Add a layer of rocks and gravel, then fill the hole with concrete.

5. Attach the Fence to the Second Post and Install It.

Stretch out your fence material. For our project, we used two lengths of fence. Be sure to measure and allow an amount for wrapping around the edges, so that the majority of your staples and nails will be on the back of the posts. Before installing the second post, wrap the rabbit fence around the outside of it and secure the fence to the back of the post the back using u-nails. Then install the second post using the same method as the first.


 Now allow the concrete to set. We waited a week before proceeding. You might need to put up a brace to support your post.

 6. Finish Installing Fence.

When your concrete has set, wrap the fence around the other post and secure using staples and/or u-nails.


7. Attach Wisteria Using String.

The string also helped anchor my existing trellis to the new fence trellis. I'm sure the fence will be completely covered next spring. 

And that's it! I hope this gives you some ideas for taming your climbing plants and filling up a long vacant wall. 

Monday, November 19, 2012

Waxing Poetical on Wisteria

Soon I'll be posting the second entry in the showcase of projects my husband completed recently. But first, would you like to hear the long story behind it? Of course you would. If not, scroll through to the next post.

My Wisteria and Rose Bouquet
Have you ever been to the Albuquerque Botanical Gardens? (See, told you it was a long story.)  If you have, you probably would not forget the Ceremonial Rose Garden. For those of you who haven't been, the rose garden features a very large arbor covered with the most beautiful and delicate lavender flowers that cascade like grapes. I fell in love with that garden from the moment I first saw it. Everything from the copper roof accents to the gnarly trunks of the vines was beautiful. I decided then that wisteria was my favorite flower (even featuring it in my wedding bouquet, see picture at left).

You may remember we lived in England for a time and I LOVED it. One of the things that England is rightly famous for is the beautiful gardens. I don't know if it's because of the rich soil, the gentle misty winters, or a combination of both.

Case in point: in England I had two rosemary bushes that grew almost like weeds. I trimmed and shaped them like hedges and had plenty of rosemary for cooking. Here, I have unsuccessfully planted and soon after killed two rosemary bushes. Now I have a pathetic sickly-looking one in a pot on my windowsill. That seems to be the only way I can keep them alive. I digress.

Back to wisteria- one of our regular commutes in England meandered through a village. It was not a particularly old or beautiful village when compared to the pristine ones you find on postcards (although those do exist and are marvelous), but it was the sort of village where life continued to plod along. Buildings were more likely to be mended than replaced. When new buildings were added, the most recent being in the late 1970s or early 1980s by my rough guess, they were done so in entire streetfuls so that you had three or four streets full of older houses across from a whole block of ugly apartment buildings. Instead of ruining the older houses, the apartments seemed to heighten their beauty by contrast. On one side, you had an ideal of what, to an American like me, I would assume all of England would look like. On the other, with the apartments, was the stark realization that life progressed. People needed inexpensive housing, just as they do in America, and so the utilitarian housing units were brought in to serve that purpose.

On the side with the older houses, which mind you weren't incredibly old, just old enough to be cute, was one house in particular that was covered with wisteria. I loved that house. In the winter it wasn't much. The vines lay dormant, swirled and intertwined like a Celtic braid. In the spring, the vines suddenly brought forth the most amazing display of light purple and white flowers, completely blanketing the front of the house.

So when we moved here and bought our current house, I started messing with the garden right away. I was determined to slowly but surely transform our yard into a beautiful English garden, complete with a wisteria-covered wall. So finally I purchased a little wisteria plant and put it next to my big empty wall in front of a decorative trellis. It bloomed and thrived, but the poor thing could not attach itself to the wall. Go figure, vinyl siding is not as wisteria-friendly as brick (probably a good thing, too, I can just picture the little tendrils working their way between the panels. So plan B- look it up on Pinterest! My husband and I (he's actually a more avid pinner than I am) both did some research, sketched out our ideas, collaborated, and finally agreed upon a design. Hopefully not long after Thanksgiving I'll be posting what we did.

P.S. Sorry for waxing poetical tonight. This is National Novel Writing Month and I'm forcing myself not to participate because I'm overbooked. All that pent-up literary creativity had to get dumped somewhere, right? 


Saturday, November 17, 2012

PVC Soccer Goal Net

PVC Soccer Goal Net

Our eldest daughter had a birthday party this last weekend. Normally, I try to do something handmade for each of the girls' birthdays. But this year, October was swallowed up by my coursework (we're talking stay up until 2 AM working, get up at 8 the next morning every day, only taking breaks for church and Friday night painting). So this year, I delegated the making of the handmade gift to my amazing husband. I picked out this Soccer Goal from Six Sisters' Stuff and sent the man to the hardware store. While he was there, he picked up the materials for a few other projects and I'll be sharing those as they get wrapped up.

The tutorial was great and here's our result:


The tutorial called for a mesh material, but I decided I would make a net out of string. For my first attempt, I used some cotton kitchen string I had left over, but it wasn't very durable. It looked great on the first day, at least! Here's a pic:

So we needed to upgrade to something sturdier and a little more permanent.

Here's what you'll need:

  • vinyl-wrapped utility cord (I had this left over from my attempts at putting up a clothesline in my yard. Turns out I'm allergic to grass and pollen and shouldn't be drying my clothes on a line, but I digress...) I had 100 feet and used less than half for one goal. 
  • small zip ties (leftovers again), they don't have to be super duty, bargain bin zip ties work fine. 
You'll also need some scissors.


1. Corner Lines.

I ran a line from the upper corner to the back corner on each side. (Note: I tied this line, then switched to zip ties for everything else because the zip ties were easier and held the rope more tightly).


2. Install Verticals on Sides. 

A. To do this, stretch a length of rope parallel to the vertical support and about 4" away from it. At the top, wrap the rope around the diagonal rope you installed in step 1. Secure with a zip tie.

B. Then stretch the new vertical rope tightly and wrap around the bottom goal support twice. Secure the end with another zip tie.

C. Repeat with a second vertical rope 4" from the first, and a third 4" from the second.

D. Repeat steps A-C with the other side.

3. Install Horizontals. 

A. Wrap the end of a piece of rope twice around the vertical goal support about 4" from the bottom of the goal. Secure with a zip tie.


B. Stretch the rope across all three vertical ropes. Secure intersections with zip ties.
C. Zip tie the horizontal rope to the diagonal rope installed in step 1. Try to keep the horizontal rope as parallel to the ground as possible. Wrap the horizontal rope around the diagonal frame bar once fully. Repeat for the second diagonal frame bar.

D. Repeat step B with other side.

E. Wrap the end of the horizontal rope around the vertical support twice and secure with a zip tie.

F. Repeat steps A-E with a second, third, and fourth horizontal rope, each 4" above the last.

 4. Install Verticals. 

Using the same method, install three vertical ropes from the top bar to the back bar of the goal, running parallel to the diagonal supports and 4" apart (approximately). Then install a zip tie on every place where the lines cross. I suppose that's optional, but I'd recommend it or this might happen:


Yep, she totally loves the goals. I just realized I don't have any completed pictures, so I'll try to get them tomorrow. Er, today. Wow, is it that late already?


 You can trim the ends of your zip ties if you want, but I have not per the birthday girl's request. She says it looks like a porcupine house, so the zip ties stay for now.
 And here's the difference in durability between the string net (left) and the clothesline net (right). (The gap at the bottom is due to the contour of the backyard, not shoddy workmanship. ) This picture was taken after the goals were used at the birthday, then left out in the rain for a week. They are holding up really well! Now to put the clothesline on the other goal.