Showing posts with label Upcycle. Show all posts

Friday, June 28, 2013

Restoring a Vintage Quilt

In my quest to find the perfect bedspread for my mother-in-law's new room, I came across a beautiful handmade quilt in decidedly less-than-perfect condition from Red Brick Cottage on Etsy. This quilt had a lot more history than the others I had been looking at and was cheaper. According to the description, the quilt was "created in the 1920's by the aunt of a friend" of the seller. (The aunt had provided the date.)  I knew it would take a bit of work and love to get it back to working status.

Vintage Red and Turquoise 9 Square Quilt
Before

My new project arrived bundled in plastic via the mail. I was pretty excited to get started on it, but I took a few minutes to give it a checkup before launching in. Here are the problems I identified and the solutions.

Vintage Red and Turquoise 9 Square Quilt
Dirt on the Edge


Problem #1: Dirt

The seller was hesitant to clean the quilt, and for good reason. One edge was very fragile, the batting was clumping badly, and the colors might bleed. One edge was visibly soiled.


Vintage Red and Turquoise 9 Square Quilt
Hanging to Dry

Solution: 

I carefully removed the batting first. I planned to soak the quilt top and back in the tub in Oxi-Clean, but as soon as I got the water running, the color started running as well. I yanked the quilt out of the tub and put in in the washing machine on the hand-wash cycle with cold water. Then I hung it to dry on the shower curtain rod. Not all of the stains were removed, but at least now the quilt was clean enough to work on.


 Problem #2: Yarn Ties

At one point, this quilt was held together with knotted pieces of yarn. Over time, the yarn had disintegrated in places, which led to other problems.
Vintage Red and Turquoise 9 Square Quilt

Vintage Red and Turquoise 9 Square Quilt 

Solution:

I carefully snipped off all the old yarn ties. After replacing the batting (which I will address next) I hand quilted the squares instead of using yarn ties. This was the most tedious part, but also the most fun. On the blue squares, I made a smaller blue square with matching thread. On the red parts, I used red thread to trace some of the designs that were printed on the fabric. Vintage Red and Turquoise 9 Square Quilt

Problem #3: Batting

Because of the yarn tie problem, the batting had shifted considerably. Some places had no batting at all and others were up to two inches thick. Check out the pictures of the lumpiness (not the quilt is not on anything, it's that lumpy!). I decided to undo the stitching on one end of the quilt and discovered the batting was very old cotton with plant debris in it. New batting was a must.
Vintage Red and Turquoise 9 Square QuiltVintage Red and Turquoise 9 Square Quilt Vintage Red and Turquoise 9 Square Quilt

Vintage Red and Turquoise 9 Square QuiltSolution:

Vintage Red and Turquoise 9 Square Quilt
My Assistant
Well, I thought about trying to save the batting, but only for a little while. I then thought of using an old store-bought comforter I had as the batting. After doing some research, I discovered that several people were using this approach to save money on batting and to recycle old materials.  Since this quilt was very nearly a twin-size quilt, I used my twin-size comforter from college. Not only did it give added warmth and cheap batting, but the finished quilt underneath the quilt top provides a second layer of protection for the batting. 

I carefully cut the stitches on one edge of the quilt and placed my quilt inside like a duvet cover. Then I fixed the burst seams (which I will discuss next). After which, I trimmed off the excess of my quilt. Then I folded the edges of the red quilt under and pinned them with safety pins. In keeping with the hand-stitched nature of this quilt, I hand stitched the edge. 

As for the batting, it sadly didn't make it. No matter how much soaking and scrubbing I did, the water drained out brown. Pretty gross.

Vintage Red and Turquoise 9 Square Quilt 


Problem #4: Burst Seams

One edge of the quilt had several seams that had come undone. At some point some of these had been repaired by hand with a large diagonal stitch.  

Vintage Red and Turquoise 9 Square Quilt

Vintage Red and Turquoise 9 Square QuiltSolution: 

I removed the large stitches with a seam ripper and put in my own. Not a hard fix, just tedious.


Vintage Red and Turquoise 9 Square QuiltProblem #5: Small Holes

There was one small hole on the back of the quilt that could be easily patched. The main problem was the area along the edge that I had cut. In several places, the fabric had worn out pretty badly.

Vintage Red and Turquoise 9 Square Quilt
 Solution: 

When I replaced the batting, I used more seam allowance on the edge. This meant that most of the rough spots were turned under, but I did lose about an inch on the length of the quilt. I thought it a fair compromise.

The small hole on the back I patched with a small piece of fabric.


Vintage Red and Turquoise 9 Square Quilt


Vintage Red and Turquoise 9 Square Quilt

Problem #6: Fading

Some of the squares, particularly in one area, have faded.
In the picture at right, see where the yarn tie has been removed.

Solution:

Short of replacing the faded areas, there was nothing more I could do. I decided to leave it since it would add to the character of the quilt and the fading was not too severe.

Vintage Red and Turquoise 9 Square QuiltProblem #7: Irregularities

Based on what I've seen on this quilt, I'm guessing it was intended to be a daily use quilt and not a showpiece. The quilter who made it added strips between some of the squares to make the pieces fit. One end of the quilt has a large red strip. Most of the back is a pink fabric, but one on end is a large brown strip.

Solution:

None, really. This is where my favorite motto comes in handy: "It doesn't have to be perfect, it's Just Folk Art." All of the quirky details tell the story of the previous quilter and I, for one, don't want to remove that story. 


Now that you've seen all the issues that were remedied, check out some of the amazing things this quilt has going for it. First, it's been entirely stitched by hand. All the work I did was by hand as well.

Vintage Red and Turquoise 9 Square QuiltVintage Red and Turquoise 9 Square Quilt

There is no doubt this quilt is old, but I'm not entirely sure it's from the 1920s. I asked my mom, who thinks a few of the squares might be as new as the 1970s. I was guessing 1960s because of the red sections. What do you all think? Any clues would be greatly appreciated.
Vintage Red and Turquoise 9 Square QuiltVintage Red and Turquoise 9 Square Quilt

And finally, the reveal!

I have had fun working on this project. It had a lot of character and charm, I just added some stability and a lot of little stitches. I hope you will be inspired to take on a restoration project of your own.
Vintage Red and Turquoise 9 Square QuiltVintage Red and Turquoise 9 Square QuiltAbuela's RoomAbuela's Quilt


Friday, July 6, 2012

Union Jack Miniature Rag Rug

Do you know what happens when you watch Doctor Who while making an American flag rag rug? You begin to look around and think, hmm, look at all this extra red, white, and blue I have laying around. The American flag turned out pretty well. Ooh! A Union Jack! That would be more of a challenge. Let's do it! 

Now sometimes I will show you a craft or a technique that I've made several times and I'm quite comfortable with. Other times, I have no clue what I'm doing and I'll figure it out as I go along. This was one of the latter. I've made rag rugs, and the American rag rug turned out tolerable, I suppose. But the Union Jack turned out to be a fun little challenge. Here goes!


What You'll Need:

(I actually took some measurements this time, so you'll have a better idea of how much you will need.)

  • Red Fabric Rope (about 70 inches)
  • White Fabric Rope (about 98 inches)
  • Blue Fabric Rope (about 98 inches)
  • Red, White, and Blue Thread to match

 1. Make Your Fabric Ropes.

A. Starting Out
For instructions on fabric ropes, check out my Rag Rug Basics post. I've been playing around with a different way to start the braid, so I'll share that with you now.

1a. Alternate Start Method.

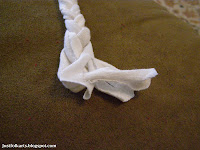
 A. Cut fabric into 1" (ish) strips. Cut a small slit into each end of each strip. Lay out your first three strips as shown at right.

B. Stacking


B. Stack two of the strips, making sure to align the slits.


C. Thread the third strip through the other two.


D. Thread one end of the third strip through the slit on the other end. 

E. Continue to pull the end through until the loop is closed. 

F. Begin braiding like normal.
 G. See how nice it looks? Easier done than said, right?


1b. Alternate End Method.

Cutting slits in ahead of time also makes it really easy to tie off an end, either when you're completely finished or just need to take a break.
 At left is a picture of the end of the braid.
 Simply pass the left piece (helps if it's the longest) over the center one and thread it through the slit on the right piece.
 And pull tight! This can be easily undone to add more if necessary.


2. Cut the pieces. 

In my American Flag Rag Rug post, I discussed how to use thread to tie off the ends of the strips we're using. I did make the fringe that extends past the thread longer on this one and it helped.

From the red rope I cut:
  • 1x 24" length
  • 2x 9"
  • 4x 7"
From the white rope I cut:
  • 4x 10 1/4"
  • 8x 7"
I cut the blue as I added it to the rag rug. Since it was the last color added, the pieces varied in size.

3. Make St. George's Cross.

We'll be starting in the middle with St. George's Cross (the vertical and horizontal red one). First, fold the 24" piece in half and using a catch stitch or a whip stitch, secure the halves together. The whip stitch is easier, but will show more of your thread on the reverse. Fold each of the 9" pieces of red in half and stitch together as well. Be sure to keep your work flat as you go.
Preparing to attach the shorter pieces.

Using a whip stitch, attach one end of each of the shorter pieces to the middle of the longer piece. 
Laying out the white pieces.
Lay out (and pin, if you wish) the 4- 10 1/4" white pieces so that they are parallel with the ends of the red pieces and form a sharp 90-degree corner at the intersection of the red pieces. Sew them in place.
Sewing in the white around St. George's Cross.

 4. Make St. Patrick's Saltire.

Now we'll be working on the diagonal red and white pieces. Lay out the remaining red pieces as shown below.
Starting on St. Patrick
 Then lay out the remaining white pieces so that each diagonal red piece has a white one running parallel to it on either side. It may help with the corners to trim the ends of the white pieces diagonally, as shown below.

Trim the ends.
 Secure the parallel white and red pieces to each other.
About to sew St. Patrick to St. George

Then sew the ends to the corners of the white pieces on St. George's cross. Extra points for authenticity if you can make the correct thicknesses and corner alignments. Since I knew this Union Jack was going to be claimed by a certain 5-year-old, I didn't stress too much about it. 
Securing the Diagonals

 5. Make St. Andrew's Cross.

Now we'll be adding in the blue, one strip at a time. First, attach a strip of blue parallel to each of the diagonal white strips.
Adding the Blue
 Then add a shorter strip parallel to each of the vertical white strips.

And add a blue strip parallel to each of the horizontal white strips. 
 Due to variations in thickness, just the strips I mentioned filled up one blue "pie slice" of my Union Jack.
 Where necessary, add another blue strip folded like a V. You may need to be creative with the stitching and cornering. This is where using T-shirt material comes in handy. It stretches, doesn't fray, and is quite forgiving with the bends.

6. Trim the Edges.

If your rug turned out a little crooked, or if it won't lay flat, don't trim the edges yet.  Soak it in water, then lay it flat, using weights if necessary to flatten it out. Once it's dry, continue with trimming.

Use a ruler and a pencil to mark the edges you wish to cut.

Use heavy duty scissors to cut off the ends. Then sew the edges using an overcast stitch. This part might be a little tricky as the braids will try to come apart as soon as you trim the edges. 
 Then trim off any pieces which are sticking up or unsightly. Be careful not to cut through your stitches.
 Trim away any errant thread ends.

 And you're done!


 I used some different colors with the Union Jack and made it a little larger than Old Glory to get all the detail in that I wanted.