Showing posts with label Party. Show all posts

Thursday, January 24, 2013

Canvas Painting Party

I'm sure all of you have seen those amazing birthday parties on Pinterest and other places where everything looks perfect. The favors are adorable, the cake looks professional, even the kids are photogenic. You know the ones. I'm sure, given the right budget, amount of time, and a professional team of house cleaners, I could throw one of those parties. Until that day arrives, I will continue to approach birthday parties with my same formula.

1. A theme, kinda keeps things together. This year was Cake and Canvas, a clever parody of the Coffee and Canvas classes I teach at our church.

2. Something homemade. This year, it was these cool canvases. For the younger daughter's birthday a couple years ago, I made owl treat bags out of fabric.

3. Save a year, splurge a year. The older daughter (I seriously need clever nicknames for these two kids) got to have a ceramics-painting party at a studio last year followed up by a tea party with the cups the girls painted. This year, an inexpensive home party.

4. Buy as little licensed merchandise as possible. For our Hello Kitty party, we bought Hello Kitty plates, cups, and a tablecloth. We made a Hello Kitty pinata. Everything else was purchased in coordinating colors.

5. Try to have something cool as a party favor. For this party, we bought plastic cups that look like crayons. We filled each cup with two paintbrushes and enough candy for the brushes to stand up. The kids got to use their new brushes to paint and took them (and their painting) home after. Did I get a picture? No, sorry.

6. I'm sure this won't count as any sort of tip, but if you have a friend who is an aspiring baker and offers you a cake instead of a gift, take her up on it! I am so blessed to have an amazing friend who bakes the girls' cakes for me. They always turn out so well. Again, no picture. But this year's cake was a palette with different colored icing globs of "paint" on it.


Prepping Paint Boards for a "Canvas" Party 

The irony of this "Cake and Canvas" party is that we didn't actually use canvas at all. The kids painted on thin plywood panels that we tacked to our fence. Here's what we did ( and by we, I mean my amazing man. I helped a little and took pictures). 

Here's What You'll Need:

  • 1- 4' x 8'  plywood underlay board, approx. 1/4" thick. I believe ours was around $10. 
  • Saw
  • Kilz 2 Latex primer
  • Paint Roller
  • Hammer
  • Nails

1. Cut the boards. 

Cutting the board in half lengthwise, then cutting the halves into 18" wide segments will yield 10 18" x 24" boards. Or, you can leave the last two segments longer and have 8 18" x 24" boards and 2 24" x 24" boards.

2. Sand and Primer the Boards. 

If you're feeling like an over-achiever, you can even use some wood putty to fill in any imperfections. Use a paint roller and apply 1-2 coats of latex primer. Even the birthday girl stepped in to help on this one.

Note: your boards may begin to warp. If so, after they are dry, stack them and place a weight on top to counteract the warp.


3. Tack the Boards to Your Fence. 

We used small nails, but you could use a staple gun (in theory, that is, haven't tried it).

P. S. This party was on a very warm day in November, in case you were wondering. I've got a few other posts from last year I'm still working on. 

4. Set up the Paint Refill/Handwashing Station. 

As they arrived, each kid was given two paintbrushes in his/her treat cup. We also provided palettes by cutting thumb holes in foam plates. (I had wanted to make berets, too, but ran out of time). Then we loaded up the palettes with 3-4 colors of tempera paint for each kid. We have a plastic picnic table that served well for our paint refill station. The hand-washing station consisted of a large plastic tub filled with warm soapy water. It came in handy since each child finished his/her painting at a different time. Those who were finished could wash their hands and go play. Here's the birthday girl herself playing in the bubbles. Look closely and you might be able to spot a couple of the party favors.


5. Enjoy Your Guests' Creativity. 

The kids had a blast decorating their paintings. We had a couple canvas left over, so my sister and I tried our hand at splatter painting. So fun. After the painting was finished, we went inside for cake, ice cream, and presents. By then, the paintings were pretty much dry. As the guests left, we pulled their art off the fence, removed any tacks, and sent it home.

But wait, you're not done yet! We discovered something pretty nifty about these little boards. See the above painting? While it might look like an abstract interpretation of earthworms and purple yarn, it's actually a prime example of the birthday girl playing with the paint rather than painting. Which was fine. She had fun, which was the goal, but she wasn't happy with her art. So, on to round 2, if you want. I'll demonstrate with mine.

6. Rinse/Scrub/Rinse for a Clean Canvas. 

Since we used non-toxic tempera paint, we were able to rinse it off outside. Then we took a scrub brush to get off most of the paint. Another rinse, and the globs of paint were gone. Yes, I did feel like a painting executioner. Some of the color remained, but it was much lighter than before.

Before

During
After   

7. And Paint Again! 

I'm sure you would be able to repeat the process a few times before the canvas was too stained to paint over. Even then, you could switch to acrylic for the last round and make the painting permanent. 


Friday, June 8, 2012

A Word About Henna Tattoos

I've been fascinated by henna tattoos for a while now. I'm not sure when my interest started or where. Last summer, my sisters and I bought our first henna kit and did a few tattoos. This year, a friend asked if I would do henna tattoos for her daughter's birthday party. It sounded like too much fun to pass up (and it was a blast!).

If you are interested in henna tattoos, here are a couple pointers.

1. Invest in a decent kit. 

I've used Earth Henna's Kit (available on Amazon) twice now and loved it both times. It comes with everything you need and the henna lasts 10-15 days, depending on how long you leave the henna on and how much you wash the area. I tried another brand that was much cheaper and I didn't like it at all. The Earth Henna kit has a squeeze bottle applicator with a syringe tip, while the cheaper kit had a bag and nozzle setup that I found nearly impossible to manage.

2. Practice! Practice! Practice!

One of the girls at the party brought a book on the art of henna which recommended you keep a notebook with you to sketch things that might inspire your designs. I practice my henna designs (or Celtic knots) every Sunday. I'm a doodler and can pay attention better if I have something to scribble on. You can check my notes, every blank is filled in, but the top usually looks something like this:

From time to time, I look up new designs on the internet and draw whatever catches my eye. I'd love to give credit to the websites where I got these designs, but I've lost the links. These are hand-drawn (the blue ones with a fountain pen, the black with a fine point pen). I suppose a permanent marker would be a better facsimile for the henna tattoo applicator's width, but I was trying to jot as many ideas as possible on one page.


The kit also suggests you use toothpaste in the applicator to familiarize yourself with it. Our favorite ceramics place uses the same type of applicators so we get lots of practice with them there.

3. Think about design and placement. 

A lot of the above designs are meant for hand placement, but can adapted elsewhere. I've seen some beautiful henna tattoos on pregnant women's bellies. Also, the tattoo will remain for up to two weeks. If your workplace has policies against visible tattoos, you may need to rethink the gorgeous hand design.

Doing a henna tattoo is also a great way to try out the placement of a permanent tattoo. If you apply the design with henna, you'll have a couple weeks to see how easy it is to live with/show off/cover up.

4. Have fun with it!

Traditional style tattoos are gorgeous, but no one said you have to stick to them. At the party, we were drawing unicorns, cats, infinity love symbols, etc. Here are some of the designs we painted:


I hope this helps!

Sunday, April 29, 2012

Angry Birds King Pig Pinata

Whoops! In my last post, I believe I said my next project was a duvet cover. Well, I haven't worked any more on the duvet cover and I had already planned to make this pinata for my daughter's 2nd birthday. My oldest (now 5) was a talker, but her sister is not. She nods, points, signs, etc, but not a lot of words. As far as I know, she doesn't have a favorite TV show or character, but she LOVES Angry Birds (and Cars 2, but sister's 2nd birthday was Cars-themed and the baby seems to like Angry Birds more). She plays them on the iPad, she plays them on the phone, she gets really excited when she sees them in the stores, and she even climbs all over me to point to any that show up on my computer screen.

We had our theme! Angry Birds! I started doing some research to see what Angry Birds party supplies were available. I suppose for party supplies, the prices weren't too bad. We didn't need a lot, since we deliberately kept the guest list very small (we rented an inflatable slide and a bouncy castle and didn't want her to have to compete with a ton of other kids for a turn). When you're used to paying $1 for 8 plates at the dollar store, the thought of paying $4 for 8 plates + shipping is a little much. And she's 2, she won't care about the plates. The 5-year-old might, but not the little one.

Here's the other problem with buying premade party supplies: the pinatas are usually pretty awful. They are made of cardboard with a cheap tissue paper exterior. Okay, maybe they're cheap and cheerful (as one of my favorite shows often says). No, on average they range from $20-$70. Pretty pricey, considering the materials cost less than $5 and it doesn't take a lot of skill to make them. Without further ado, here is my take on the Angry Birds King Pig Pinata.

Angry Birds King Pig Pinata

Our Pinata Ingredients

1. Gather your supplies. 

To make a regular pig pinata you will need: 

  • Newspaper, torn into 1" wide strips
  • White paper- I recycled some packing paper, but copy paper will work as well. 
  • Green tissue paper- 2-3 sheets
  • White Glue or Craft Glue (I used Allene's Tacky Glue).*
  • A Balloon, inflated with regular air and tied- round would be best, but we used an egg-shaped one. 
  • 1 8.5 x 11" sheet card stock
*Alternatively, you can make a very inexpensive glue from flour and water, but if you don't blend it just right, it will leave floury clumps on your finished product. Also, it tends to dry off-white to yellow.

To make a king pig, you'll need the above,  plus:

  • Aluminum foil
  • 1 8.5 x 11" sheet card stock
  • 4 plastic gems, approximately 1/2-1" in diameter. We recycled some that used to be in a stepping stone. 
  • Tape

To make a structure for the pig to sit on, you'll need:

  • Cardboard boxes of various sizes
  • Contact paper that looks like marble
  • Craft paper or paper grocery bags
  • Packing Tape
  • Brown marker
Glue Mixture

 2. Mix your glue. 

Mix equal parts glue and water in a large bowl. If the glue is a very good quality and/or very thick, increase the amount of water. I used about 1/2 cup glue and 3/4 cup water. The mixture should look and feel like whole milk.

 3. Apply the newspaper layer. 

Newspaper Strips in the Glue Bowl
This pinata will have 3 layers: newspaper, white paper, and tissue paper. The newspaper layer gives it structure. Put a handful of newspaper strips into your glue mixture. Don't put too many in at once or they will get too soggy and rip when you try to use them.The strips should be wet, but not saturated.


Pull one strip at a time from the bowl. Gently slide the strip between your index and middle fingers to get rid of the excess glue. Some of your strips will probably rip in this process, and that's okay.

(As a side note, I'm pretty proud of my 5-year-old who took the picture to the right and a lot of my other pictures on this post. No, I don't have a rash, that's a fading henna tattoo. )

Lay the strip of newspaper on the the balloon and smooth it down. I chose to do the first layer longitudinally. Keep applying strips, overlapping by a little bit each time. Patch any bare spots where you can still see the balloon with small or torn pieces. Also, using a second bowl to hold the balloon will help.


When that end of the balloon is fully covered, flip the balloon over and do the other side.


Laying down the first strips

First side nearly covered


First half finished

Starting second half

Putting on the final pieces


4. Apply white paper layer.


Starting the white paper layer
 Next add a layer of white paper using the same process as the newspaper layer. The packing paper I used did not tear as easily as the newspaper, so the strips were wider and more uneven. They also absorbed more of the glue mix and tore more easily when wet. Lay the white strips latitudinally over the newspaper strips.
Almost done!


5. Apply the tissue paper layer.

The tissue paper is the most fragile layer of the three. Since the white paper was pretty wet from the glue mixture, I pressed the tissue paper directly on top of it without soaking it in the glue first. Smooth any dry spots or places where the tissue paper is sticking up by spreading a little glue mixture over the spot with your fingers.


6. Make the crown. 

If you aren't doing a king pig, skip on down to step 7.

Fold your piece of card stock in half (short way), then in half again, parallel to your first fold.


Using the folds as a guide, mark and cut a zigzag line. This will give you 2 crowns to choose from. We went with the taller one. 

Tear a piece of aluminum foil just a little bit longer than the crown. Place the foil shiny side down on a table. Place the crown on the foil with the top of the points about 1/4" below the edge of the foil. Fold the excess foil up over the body of the crown, making sure the bottom of the crown is in the fold line. 

Cut a line from halfway between each two points of the crown to the lowest points in the "valleys" between.

Fold the cut pieces toward the crown points. 

Cut off the excess and hold in place with clear tape. 

Fold over the outside edges and hold in place with tape as well. 

I had decided to make my life easy and just use a silver crown. But my aforementioned 5-year-old insisted we needed a gold crown and offered to do it herself. Here she is performing alchemy with a yellow sharpie. 

Tape the two half-points together to make the crown. Using super glue, glue the gems in place. A word of warning- the super glue on ours reacted with the sharpie and turned bright red. One of our gems was a very pale blue and looked red on the finished product.

7. Dry the pinata. 

Allow the pinata to dry until the outer shell is stiff, at least overnight. Depending on how many layers you've put on it and/or the amount of glue you've used, it may take longer.

8. Fill it! 

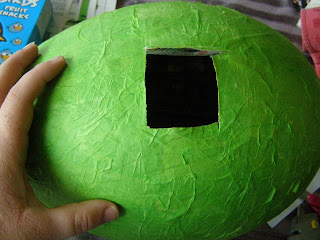
Once the pinata is fully dry, mark a 2" square on the top of the "head." Using a sharp knife, cut 3 sides of the square. The balloon inside will pop with the first cut. Pull it out and discard (I had to borrow my daughter for this step). Make sure the inside of the pinata is dry before filling. Fill with your desired items. We used fruit snacks, soft pool balls, and lollipops. Since most of the guests were under 2, we shied away from an all-candy pinata. You could also use pencils, small bottles of bubbles, etc.
Our pinata filling materials


Once the pinata is filled, seal the hole with tape. If you are not adding a crown, you will need to cover the area with another layer of tissue paper. We covered it up by putting the crown on top with masking tape. 

9. Make the face. 

Use the 8.5 x 11" sheet of paper to make the pig's face. I drew mine to give my printer a break, but you can find a picture on the internet and print it out. Attach the face with glue.


10. Make the structure.

Wrap some of the boxes with the marble print contact paper. Wrap the other boxes with craft paper. Use the brown marker to make wood grain designs.

11. Set it up and enjoy!

Use the boxes to make a structure. Instead of hitting this pinata with a stick, the kids took turns throwing their stuffed angry birds at it. Then the baby pushed the whole thing over. The pinata took several hits. It finally busted when we threw it straight up in the air. It was so much fun! My girls still have the crown to play with and love to set up and knock over the boxes.