Showing posts with label fast. Show all posts

Saturday, July 13, 2013

How to Make a Canopy Rod and the Saga of the Canopy

By the end of this post, I'll show you how to make some neat-looking canopy rods from dowels and wood flowers. But first I'll clue you in on the process of budget and reality meeting design and expectation.

As you might know by now, I've been working on a room for my mother-in-law. The room was originally one of the girls' bedrooms, but they have graciously agreed to share in order to have almost unlimited grandmother time while she's here. We've had a canopy that has remained in the room through all of its many transformations (from toddler bed to queen size to twin). Now I wanted to change it up a bit.

It's better if I show you this part in drawings. Below you will see the original plan for the room. The canopy would be hung from a single rod in the middle and draped gracefully across the edges of a wooden bed we planned to make.

Canopy Plan
The wooden bed got put on hold. Neither my husband nor I seemed to have the time available to build it and it would require both of us and more tools. So I considered buying an iron daybed frame with some baskets for storage underneath.
Canopy Plan
The budget did not allow for an iron daybed, so for the time being, the mattresses would remain on the floor. The drawing below is how the canopy was arranged above the bed when I started my final preparations just hours before Abuela was to arrive (although I forgot to draw the back part of the canopy that is against the wall.)

Canopy Plan


So my new plan was to install metal hooks where the corners were attached (currently the corners were hung on large command hooks). From the outer corners I would suspend the rods I had made (coming up in a bit, bear with me or just scroll down) on safety wire. I would suspend the middle rod on shorter pieces of safety wire from two more metal hooks.

Canopy Plan

The hooks I bought? Not the right kind at all. The first one I installed pulled out of the ceiling way too easily. I had no time to run to the store, so I thought of running the safety wire from the command hooks and trying to suspend my wires from there.

Canopy Plan

You guessed it. Too much wire. It looked atrocious. Also, procrastination is a killer. Thirty minutes before time to leave the house, I settled on the following arrangement.
Canopy Plan

Safety wire suspended between the command hooks, but hidden by the front part of the canopy. I won't tell you how many safety pins are holding up that canopy, but you probably wouldn't know unless I pointed it out. I used only one rod in the center that raised the middle of the canopy significantly.


Abuela's Room

So it's not quite what I had intended, but the canopy turned out well. Maybe by the time we get around to placing the bed in there we'll have the right anchors to redo the canopy.


Even though I only used one rod in the final design, I had made three. Without further ado, here's how I made them:


 How to Make a Decorative Canopy Rod

Or a pretty support for a tomato plant or a walking stick for a child ...you get the idea.

Canopy RodMaterials:

  • 3 dowel rods, 3/8" diameter, 3' length
  • 3 small wooden applique flowers
  • 3 small nails
  • black paint
  • silver paint

 1. Attach flowers to ends of dowel rods. 

Easier said than done, I think. The dowel rods were quite difficult to hold while hammering a nail. I ended up driving them into the ground and letting the dirt do the holding.
Canopy Rod 

Canopy Rod

2. Paint the dowel rod black. 

Don't worry about painting the flower parts just yet.

Canopy RodCanopy Rod


Canopy Rod

Canopy Rod

3. Paint the flowers silver. 

Canopy Rod

4. Allow to dry thoroughly. 

Or use a hairdryer if you're impatient or in a hurry.

Canopy Rod

5. Add black to silver flowers.

Have a damp rag or paper towel at the ready. Paint the entire flower black, making sure the paint is pushed into the crevices. Then use your damp rag to rub off as much black as is desired.

Canopy Rod

Canopy Rod

And that detail is what is at the center of our canopy.

The Cheap Way to Make Throw Pillows

Abuela's PillowsOver the past couple of weeks, I have been blogging about some projects for my mother-in-law's room. Today I'm going to share with you how I made three square throw pillows for about $8.00. So here we go!

1. Gather materials. 

Pillow forms are expensive. Way too expensive for my tastes. So for this project I bought two $3.00 el cheapo standard bed pillows. Stuffing problem solved.

Abuela's Pillows
Embroidery on the Tan Skirt
For the pillow covers, I went to my local thrift store that was having a $2 bag sale. $2.00 buys all the clothing items you can stuff into a paper grocery bag. Totally worth the money. Other thrift stores have specials where a certain tag may be 10 for a dollar and so on. Recently one of our favorite kids' resale stores had a clearance sale where you could get 10 clearance items for $10. A little pricier, but I stocked up on colorful corduroy for a later project.


Sorry, got on a tangent there. Point being, think outside the box when looking for fabric. I found two red button-up shirts and tan skirt with gorgeous embroidery for this project. The ones I used were size 12, 14, and large, which seemed just big enough. I wouldn't recommend buying anything smaller for this particular project or you might have to do some piecework (which takes the easy and quick out of it).  I recommend washing and ironing your pieces before working with them.

2. Measure and cut.

The cheapo pillows I bought were about 16" wide. I think they were technically the standard 20" x 26" size, but with the stuffing factored in, they measured more like 16". So 16" was the magic number. Factoring in a generous 1/2" seam allowance on each side, I then measured my shirts and skirt to make sure I had enough fabric for a 17" x 17" square. On the shirts, I did have go up onto the arm a little, but I had enough. The skirt, thankfully, was large enough as well. I marked the 17" square and carefully cut it out. 

Abuela's Pillows

 Abuela's Pillows

 Abuela's Pillows

 Abuela's Pillows
Then I measured 16" on the long side of the pillow. As I had hoped, 16" was just about 2/3 of the length. I carefully marked a line across and started cutting. Cutting through a pillow isn't really pretty, but it works. I repeated the process with the other pillow, which gave me two roughly 16" x 16" pillow squares that were sewn on three sides and two smaller rectangular pieces. (I kept the pillow casing on the larger pieces and tossed the pillow casing from the smaller pieces into the rag box).
 Abuela's Pillows

 Abuela's Pillows


3. Sew. 

I must confess I was in a bit of a hurry. My mother-in-law was due to arrive the next day and I still had a significant amount of cleaning and setting up to do. So instead of making a gorgeous hidden stitch to seal up my square pillow pieces, I did a pretty crude stitch (also, don't judge my pajama pants, as I said, it was getting late). What does it matter? You might be wondering. Well, here's the genius of my plan. The two shirts have buttons, which makes them ideal for removable and washable slipcovers. The odd little thirds I planned to stuff into the skirt without worrying about making it removable. Since I'm planning to be the one removing the slipcovers and washing them, it doesn't really matter. But if you were planning to make these pillows to give as a gift, you might pay more attention to the quality of your stitching on the inside.

Abuela's PillowsAbuela's Pillows
Back to the covers now. After cutting them to 17" square, I turned the right sides together and pinned them. After running a test stitch on a piece of scrap fabric, I sewed the two red pillows on all four sides (knowing I could turn them right-side-out through the buttons). I added a row of zig-zag stitching around the outside to prevent fraying.
Abuela's Pillows
I then turned the red pillows the right way and stuffed them with my cheapo pillow forms.
Abuela's Pillows
After a quick thread change, I sewed the tan pillow on three sides.Abuela's Pillows
I stuffed the odd thirds into the tan pillow and pinned it shut. Then I did a hidden stitch to close up the third side.
Abuela's Pillows

4. Enjoy!

If you haven't guessed already, I love the process of making beautiful things. So before I show you the finished product, here are a couple pillows that did not pass their audition. The birdcage one, though lovely, was entirely the wrong shade of pillow. The red one was okay, but the blue accents clashed with the turquoise of the room.

Abuela's Pillows

 Abuela's Pillows
And here are the final versions of my pillows alongside the pillows I bought to accent them. (In case you are wondering, this isn't in their final location as the light in that room isn't very good for pictures).

Abuela's Pillows

 Abuela's Pillows
 
Abuela's PillowsAbuela's Pillows

Abuela's Pillows

Thursday, June 20, 2013

Quick and Easy Rewards Chart

I am pleased to announce that I am done with school for the semester! Only two classes left until I finally get my degree.

That being said, I apologize for the lack of posts on here lately. After school wrapped up for the year, I went a little craft mad. I currently have eight new projects to share with you. It's just a matter of getting the posts typed up. Without further ado, here is one of them.

Making a Quick and Easy Rewards Chart

I found a really cute idea for rewards on Pinterest that was designed for a classroom.The basic premise was to have a reward for the class, which would be earned over time. The students would earn letters, which they could affix to the chart to spell out the name of their reward. Check out the original post on An Educator's Life here.

Okay, so I don't have a full class. I have one almost first-grader and a three-year-old, but I loved the idea. Not wanting to spend any money on a rewards chart that might not work, I got out the paper and markers to make a super cheap version.

Materials (per chart)

  • 1 12 x 18" sheet of paper
  • 4 sheets lined paper (or graph or copy)
  • 1 permanent marker
  • glue stick
  • colored markers

1. Brainstorm reward ideas. 

You'll need about 15-18 per chart. We came up with some pretty neat ideas.

Educational Outings: Science Museum, Art Museum, Children's Museum, Zoo,  Airplane Park, Nature Park, Botanical Gardens
Free But Fun: chair tent in the living room, playtime on the top bunk (which is still off-limits until the little one is a bit older), Rose Garden
Parties: tea party, painting party
Treats: favorite fast food, smoothie date, sushi dinner, apple pie, cheesecake
New Stuff: outfit, shoes, sketchbook, Matchbox Car, playdough, book, Playmobil toys
Just for Fun: summer movie program, movie date, carriage ride 

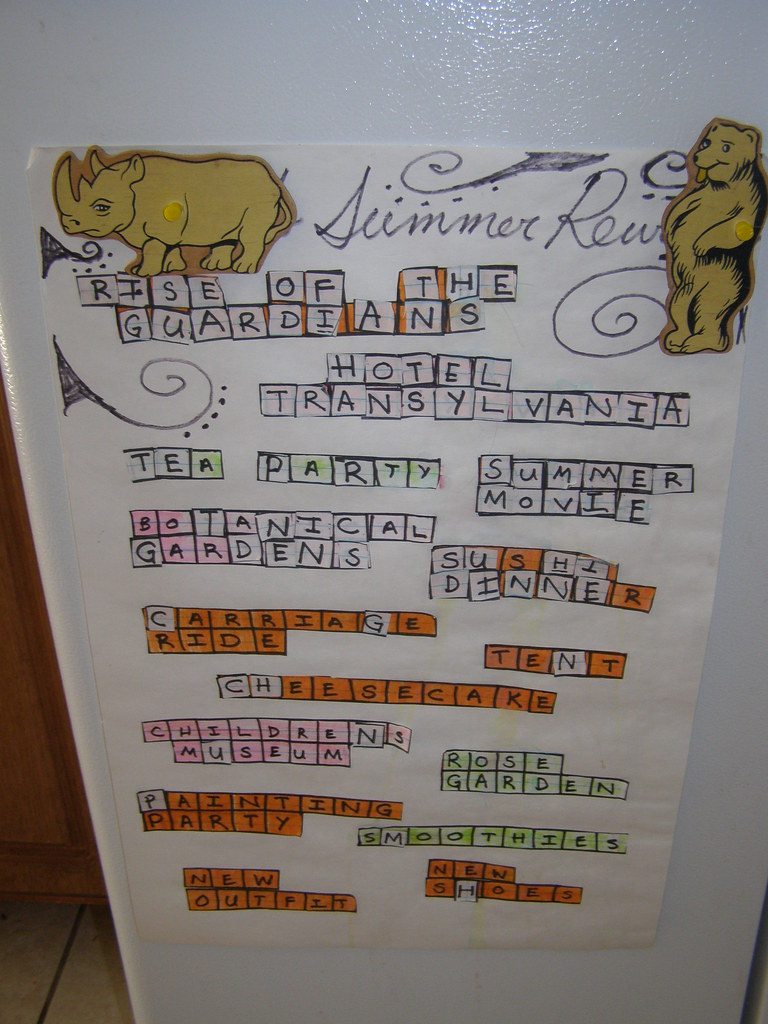
Wording is important here. The longer the name of the reward, the more effort it will take to earn. For example, if a trip to the zoo would be very cheap and easy for your family to accomplish, just spell out "zoo". If your zoo is expensive and/or difficult to get to, you might write "zoological park". I knew our oldest really wanted a couple of new movies, so I spelled out "Rise of the Guardians" and "Hotel Transylvania".

2. Make the rewards boxes.

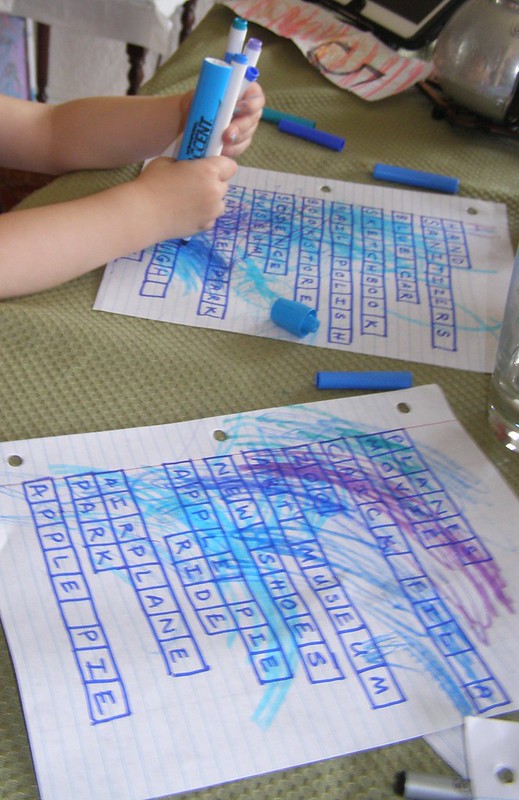
Now, to write the rewards for the charts. I just did mine freehand since this was an experiment to see if the girls would respond well to this type of reward system. On lined paper, I drew square boxes and wrote the name of the reward with capital letters, one per box. To make life easier on myself, I used a black permanent marker for all of one girl's letters and a blue permanent marker for the other one.

You'll need two identical sets of letters, one for the reward chart and one to draw out of a bag. I made a second set by laying a blank sheet of paper on top of the first, tracing the same boxes, and writing in the same rewards. 

For the rewards I would be pasting on the chart, I let the kids decorate their own. (The second set needs to be either left plain white or colored differently enough to distinguish when the reward has been earned). The three-year-old used three markers in each hand and scribbled all over the papers. The six-year-old meticulously colored each of her rewards with a different color. After they were finished, I cut out the rewards in blocks of words and pasted them to the large piece of paper. I had the girls organize their charts by priority. What they wanted to earn first went at the top of the chart. Then I added some decorative flourishes.

3. Make the letters to be earned. 

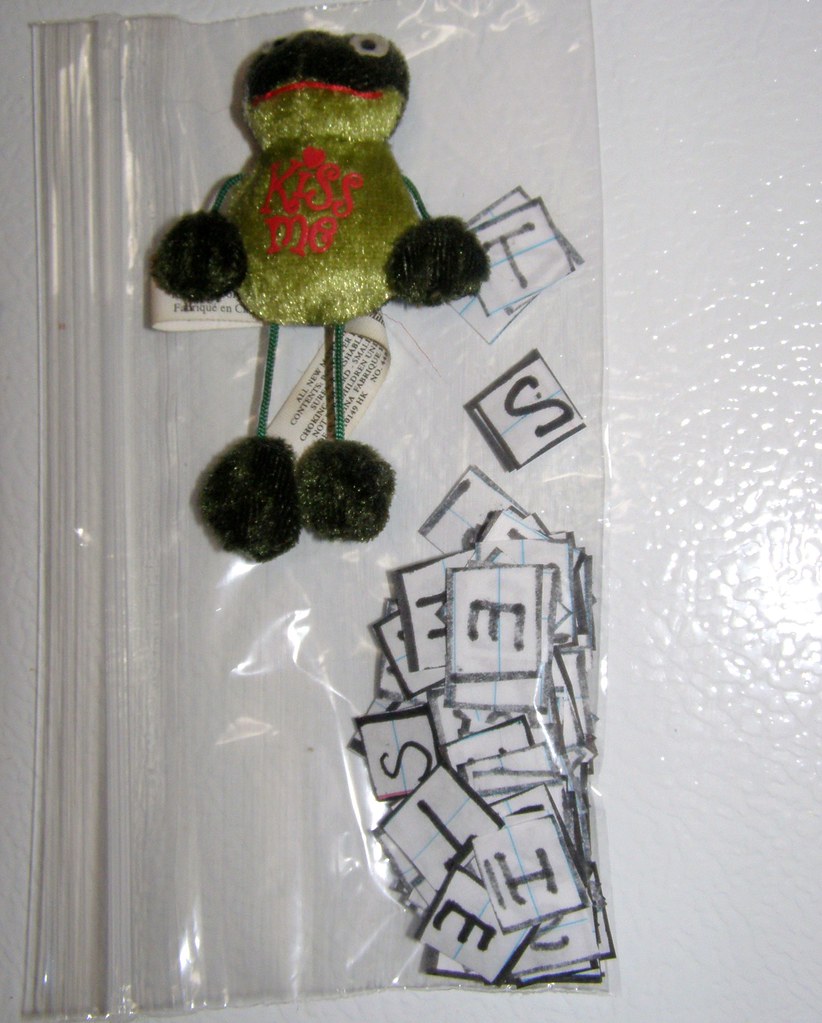
To make the letters to be earned, I cut apart the second (uncolored) set of letters. Each letter should occupy its own square. With luck, the squares will be the same size as the ones on the chart. Discard any blank boxes, such as those between letters.

Note: this picture is of the six-year-old's letters, not the three-year-old's. They are written in black, not blue. It prevents any confusion if there happens to be a random letter on the floor.

4. As letters are earned, paste them on the chart. 

So let's say the three-year-old puts away her laundry. She gets to pull a letter from her baggie. Then she matches it up and glues it onto a matching letter on her chart. When she has earned all the letters in the word, she gets the reward. At first I thought this would only work with the six-year-old, but the three-year-old is surprising me with both her desire to earn letters and her ability to match the letters she earns with the words on the chart.

5. As rewards are redeemed, mark them off the chart. 

Our preferred method has been to write the date in large numbers and letters over the name of the reward (which I had not yet done at the time of the pictures on the left). That way, the kids see when they earned that reward and when I fulfilled my promise to give it to them. Although right now, the three-year-old has earned three rewards that I have not yet been able to do with her.

So there you have it. It's cheap and easy, but seems to be working well for us.


Wednesday, May 23, 2012

Revitalizing an Old Purse

This next project was one I worked on with my sister late one girls' night. She needed a new purse to fit an iPad. I happened to have on hand an old purse with a pen mark down the front. The purse was only $2 at a thrift store and a nice, soft leather. We pulled out some scraps I had left over from other projects and decided on some dark brown tooled vinyl. Here is what we did.

Leather Purse- Note the pen mark in the middle

Supplies:

  • 1 old purse, preferably a good quality leather
  • 1 strip tooled vinyl (approx. 6" x 18" ) or large enough to cut the designs you want 
  • super glue

Process:

1. Using a sharp pair of scissors, cut the designs you want from the vinyl.

2. Arrange the designs on the purse how you wish.

On our project, we went through several trial designs before my sister decided on one. It isn't the one I would have chosen, but she's content with it and that's the important thing. Here are some of the rejected ideas:


3. Using the super glue, glue the designs in place.


4. And you're done! Simple as that. Total time: 2 hours, Total cost: around $5