Thursday, July 26, 2012

Americana Rag Rug

New Americana Rag Rug
Keeping with my rag rug obsession lately, here's another variation. So far, I've made an American Flag Rag Rug and a Union Jack Rag Rug. Earlier this year, I made a spiral version loosely based on a picture I found on Pinterest. Here's a picture of my newest rug and the one I made earlier:

Spirals Rag Rug


The colors are a lot of fun to play with. On my older rug (which was a birthday present for my sister), she picked the colors from among my scraps. The new rug is based on the colors I found in a piece of fabric, mainly bright red, navy, cream, and black.  You could do each spiral with similar colors, but I chose to integrate the colors a little more. The red spirals are fabric ropes leftover from my Union Jack Rag Rug.


Americana Rag Rug

What You'll Need:

  • Lots of scraps braided into fabric ropes (see my Rag Rug Basics post for how to make the braids).
  • Thread

1. Make the Spirals.


 Start with the end of a fabric rope and run a piece of thread through it.Since this will be a rug, I used a thick thread doubled over.
 Tightly coil the rope and sew back and forth to hold the spiral in place.
 Use a catch stitch to keep sewing as you wind the coil.


 Try to keep your spiral flat as you work. Some puckering can be flattened out with a rinse & a press, but not all. Having loose braids will help with this. When your spiral has reached the desired size, secure the end with a few overcast stitches and cut off the excess.


 Large spirals make great eye-catching centerpieces. You will need several small spirals (about 2" in diameter) to fill in gaps and edges. Of course, you could also do all the spirals the same size, I might have to try that next time.

2. Lay out your spirals. 

When you think you have enough, lay out the spirals in the desired pattern. I tend to change mine as I'm sewing it together. Place all the spirals with the stitched side up. I used a pillowcase for guidelines and for ease of moving. As you'll see later, the guidelines didn't quite work out as planned.
 Start stitching together using an overcast stitch. You'll probably need to rearrange as you go. The spirals will stretch some and morph into different shapes as you attach them to each other.
 Be sure to fill in any gaps as you go.

 3. And You're Done...Sort Of

Here is a great example of what to do when things don't turn out exactly as you had planned. Here is what I thought was my finished project:

 The more I looked at the pictures, the more I decided that it was simply too crooked. In this sort of rug, a certain amount of leeway on the edges is to be expected. After all, it's made of circles. However, this one is unacceptably crooked. So I'll probably be adding a few more pieces to it, then taking the pictures again. I'll let you know how it turns out. This one will be up for grabs in my Etsy shop once I'm satisfied with how it looks.


Clay Flowers

Clay Flowers
Since my last post, I've finished up a few projects, been working on some quilt repairs, put together my photography portfolio, and reorganized my crafts storage area. I have all the pictures ready, I just have to find a time to sit down and type out the descriptions of what I've been working on. I'm trying to scratch as many things off my to do list as I can before school starts for all of us, including me.

My sister came over and made a cardboard castle perfect for our Princess Fairies (I'll be posting that soon, also. Need to take a few final pictures.) Our Friday craft nights are becoming a tradition.

Clay Crafting

In the meantime, I've been teaching a class at our church on clay crafting. I'll be the first to admit, clay is not my primary medium. I don't have much experience with it and I certainly didn't feel qualified to teach a class about it. Still, I volunteered. The first session lasted four weeks. We did coasters, spiral boxes with lids, and wind chimes. We learned through trial and error that our cheap air dry clay was too crumbly after drying. One poor girl barely touched her box on the way out and it fell apart.

Slugs

We just finished our third week of session 2 and things seem to be going more smoothly. The first week we made crosses from air dry clay and slugs (based on Dreamwork's Flushed Away) from non-hardening clay. I had clay all over my hands, so no pictures. But the slugs were adorable, each one had a different personality. Some of the kids got creative and added stripes, spots, tail ridges, etc. I believe the Flushed Away DVD has a tutorial on how to make the slugs among the special features.


No, this isn't one of the kids' slugs. It's mine. Of course, the poor thing has been dropped, left behind at the church, and rescued. Then it came home where a certain five-year-old has been poking it with toothpicks, accidentally knocked out its tongue, reattached said tongue, and changed the facial expression three times. Poor slug!


Clay Flowers

I asked my students what they'd like to learn how to make. Several of them said flowers (including the boys, which surprised me). I didn't know the first thing about making clay flowers. I found some great tutorials online which I'll share with you here.

Rose: Digikids Arts and Crafts Rose Tutorial

Daisy and Zinnia: Modified from Scrapscene Polymer Clay Flowers

Lily: Pedro Ramirez How to Make a Polymer Clay Lily

I haven't tried the lily yet, but it looks amazing. The others turned out pretty well. The kids loved this project and learned quite a bit about working with clay. The roses are my favorite by far. The kids were having a little trouble mastering it, but looking at their projects, you can definitely tell which flowers are roses and which are daisies.

From the Scrapscene Tutorial we learned our nifty trick of the day: use baby powder on your mold to keep the clay from getting stuck.


Here are the kids' creations after they came out of the oven. Such artistic kids! The yellow squiggles on the right of the lower picture are slugs made by my daughter from the leftover scraps. 


Teddy Bear and Heart

The tiny teddy bear and heart are my creations. To make the heart, roll a small piece of clay into a ball. Pinch one end to make a teardrop shape. Use a toothpick (or your nail) to make the indention in the other end.

To make the teddy bear, roll a ball just a little larger than the size of a pea. Roll a second ball about the size of a pea and attach it to the top of the first ball. Roll two balls to 1/4" diameter. Attach these at the bottom of the larger ball as legs. Roll three balls to just larger than 1/8" diameter. Attach one on each side of the body for arms. Attach the third on the face for the muzzle. Roll three more balls, about 1/8" diameter. Attach one to the back side near the bottom for a tail. Carefully flatten the other two and attach on either side of the head for the ears. Use a toothpick to fill in facial features. Bake according to package directions.

Clay Crafting Week 3

This week, we made cups/bowls by wrapping coils of clay around flowerpots. We also made erasers using a kit. To solve the problem of kids fighting over colors, we had them all make rainbows. The boys opted to make lollipops instead. One boy added a face to his.

So far, the kids are enjoying the class and I'm liking playing with a new medium. I will probably attempt the lilies and some of the other gorgeous clay flowers I've found online at some point. For now, on to the next thing on my list!

Friday, July 6, 2012

Union Jack Miniature Rag Rug

Do you know what happens when you watch Doctor Who while making an American flag rag rug? You begin to look around and think, hmm, look at all this extra red, white, and blue I have laying around. The American flag turned out pretty well. Ooh! A Union Jack! That would be more of a challenge. Let's do it! 

Now sometimes I will show you a craft or a technique that I've made several times and I'm quite comfortable with. Other times, I have no clue what I'm doing and I'll figure it out as I go along. This was one of the latter. I've made rag rugs, and the American rag rug turned out tolerable, I suppose. But the Union Jack turned out to be a fun little challenge. Here goes!


What You'll Need:

(I actually took some measurements this time, so you'll have a better idea of how much you will need.)

  • Red Fabric Rope (about 70 inches)
  • White Fabric Rope (about 98 inches)
  • Blue Fabric Rope (about 98 inches)
  • Red, White, and Blue Thread to match

 1. Make Your Fabric Ropes.

A. Starting Out
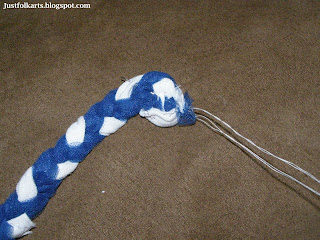
For instructions on fabric ropes, check out my Rag Rug Basics post. I've been playing around with a different way to start the braid, so I'll share that with you now.

1a. Alternate Start Method.

 A. Cut fabric into 1" (ish) strips. Cut a small slit into each end of each strip. Lay out your first three strips as shown at right.

B. Stacking


B. Stack two of the strips, making sure to align the slits.


C. Thread the third strip through the other two.


D. Thread one end of the third strip through the slit on the other end. 

E. Continue to pull the end through until the loop is closed. 

F. Begin braiding like normal.
 G. See how nice it looks? Easier done than said, right?


1b. Alternate End Method.

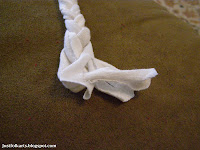
Cutting slits in ahead of time also makes it really easy to tie off an end, either when you're completely finished or just need to take a break.
 At left is a picture of the end of the braid.
 Simply pass the left piece (helps if it's the longest) over the center one and thread it through the slit on the right piece.
 And pull tight! This can be easily undone to add more if necessary.


2. Cut the pieces. 

In my American Flag Rag Rug post, I discussed how to use thread to tie off the ends of the strips we're using. I did make the fringe that extends past the thread longer on this one and it helped.

From the red rope I cut:
  • 1x 24" length
  • 2x 9"
  • 4x 7"
From the white rope I cut:
  • 4x 10 1/4"
  • 8x 7"
I cut the blue as I added it to the rag rug. Since it was the last color added, the pieces varied in size.

3. Make St. George's Cross.

We'll be starting in the middle with St. George's Cross (the vertical and horizontal red one). First, fold the 24" piece in half and using a catch stitch or a whip stitch, secure the halves together. The whip stitch is easier, but will show more of your thread on the reverse. Fold each of the 9" pieces of red in half and stitch together as well. Be sure to keep your work flat as you go.
Preparing to attach the shorter pieces.

Using a whip stitch, attach one end of each of the shorter pieces to the middle of the longer piece. 
Laying out the white pieces.
Lay out (and pin, if you wish) the 4- 10 1/4" white pieces so that they are parallel with the ends of the red pieces and form a sharp 90-degree corner at the intersection of the red pieces. Sew them in place.
Sewing in the white around St. George's Cross.

 4. Make St. Patrick's Saltire.

Now we'll be working on the diagonal red and white pieces. Lay out the remaining red pieces as shown below.
Starting on St. Patrick
 Then lay out the remaining white pieces so that each diagonal red piece has a white one running parallel to it on either side. It may help with the corners to trim the ends of the white pieces diagonally, as shown below.

Trim the ends.
 Secure the parallel white and red pieces to each other.
About to sew St. Patrick to St. George

Then sew the ends to the corners of the white pieces on St. George's cross. Extra points for authenticity if you can make the correct thicknesses and corner alignments. Since I knew this Union Jack was going to be claimed by a certain 5-year-old, I didn't stress too much about it. 
Securing the Diagonals

 5. Make St. Andrew's Cross.

Now we'll be adding in the blue, one strip at a time. First, attach a strip of blue parallel to each of the diagonal white strips.
Adding the Blue
 Then add a shorter strip parallel to each of the vertical white strips.

And add a blue strip parallel to each of the horizontal white strips. 
 Due to variations in thickness, just the strips I mentioned filled up one blue "pie slice" of my Union Jack.
 Where necessary, add another blue strip folded like a V. You may need to be creative with the stitching and cornering. This is where using T-shirt material comes in handy. It stretches, doesn't fray, and is quite forgiving with the bends.

6. Trim the Edges.

If your rug turned out a little crooked, or if it won't lay flat, don't trim the edges yet.  Soak it in water, then lay it flat, using weights if necessary to flatten it out. Once it's dry, continue with trimming.

Use a ruler and a pencil to mark the edges you wish to cut.

Use heavy duty scissors to cut off the ends. Then sew the edges using an overcast stitch. This part might be a little tricky as the braids will try to come apart as soon as you trim the edges. 
 Then trim off any pieces which are sticking up or unsightly. Be careful not to cut through your stitches.
 Trim away any errant thread ends.

 And you're done!


 I used some different colors with the Union Jack and made it a little larger than Old Glory to get all the detail in that I wanted.