 Now sometimes I will show you a craft or a technique that I've made several times and I'm quite comfortable with. Other times, I have no clue what I'm doing and I'll figure it out as I go along. This was one of the latter. I've made rag rugs, and the American rag rug turned out tolerable, I suppose. But the Union Jack turned out to be a fun little challenge. Here goes!
What You'll Need:
(I actually took some measurements this time, so you'll have a better idea of how much you will need.)- Red Fabric Rope (about 70 inches)
- White Fabric Rope (about 98 inches)
- Blue Fabric Rope (about 98 inches)
- Red, White, and Blue Thread to match
1. Make Your Fabric Ropes.
 |
| A. Starting Out |
1a. Alternate Start Method.
A. Cut fabric into 1" (ish) strips. Cut a small slit into each end of each strip. Lay out your first three strips as shown at right. | |
| B. Stacking |
B. Stack two of the strips, making sure to align the slits.
C. Thread the third strip through the other two.
D. Thread one end of the third strip through the slit on the other end.
E. Continue to pull the end through until the loop is closed.
F. Begin braiding like normal.
G. See how nice it looks? Easier done than said, right?
1b. Alternate End Method.
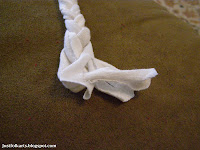
Cutting slits in ahead of time also makes it really easy to tie off an end, either when you're completely finished or just need to take a break.At left is a picture of the end of the braid.
Simply pass the left piece (helps if it's the longest) over the center one and thread it through the slit on the right piece.
And pull tight! This can be easily undone to add more if necessary.
2. Cut the pieces.
In my American Flag Rag Rug post, I discussed how to use thread to tie off the ends of the strips we're using. I did make the fringe that extends past the thread longer on this one and it helped.From the red rope I cut:
- 1x 24" length
- 2x 9"
- 4x 7"
- 4x 10 1/4"
- 8x 7"
3. Make St. George's Cross.
We'll be starting in the middle with St. George's Cross (the vertical and horizontal red one). First, fold the 24" piece in half and using a catch stitch or a whip stitch, secure the halves together. The whip stitch is easier, but will show more of your thread on the reverse. Fold each of the 9" pieces of red in half and stitch together as well. Be sure to keep your work flat as you go. |
| Preparing to attach the shorter pieces. |
Using a whip stitch, attach one end of each of the shorter pieces to the middle of the longer piece.
 |
| Laying out the white pieces. |
 |
| Sewing in the white around St. George's Cross. |
4. Make St. Patrick's Saltire.
Now we'll be working on the diagonal red and white pieces. Lay out the remaining red pieces as shown below. |
| Starting on St. Patrick |
 |
| Trim the ends. |
 |
| About to sew St. Patrick to St. George |
Then sew the ends to the corners of the white pieces on St. George's cross. Extra points for authenticity if you can make the correct thicknesses and corner alignments. Since I knew this Union Jack was going to be claimed by a certain 5-year-old, I didn't stress too much about it.
 |
| Securing the Diagonals |
5. Make St. Andrew's Cross.
Now we'll be adding in the blue, one strip at a time. First, attach a strip of blue parallel to each of the diagonal white strips. |
| Adding the Blue |
And add a blue strip parallel to each of the horizontal white strips.
Due to variations in thickness, just the strips I mentioned filled up one blue "pie slice" of my Union Jack.
Where necessary, add another blue strip folded like a V. You may need to be creative with the stitching and cornering. This is where using T-shirt material comes in handy. It stretches, doesn't fray, and is quite forgiving with the bends.
6. Trim the Edges.
If your rug turned out a little crooked, or if it won't lay flat, don't trim the edges yet. Soak it in water, then lay it flat, using weights if necessary to flatten it out. Once it's dry, continue with trimming.Use a ruler and a pencil to mark the edges you wish to cut.
Use heavy duty scissors to cut off the ends. Then sew the edges using an overcast stitch. This part might be a little tricky as the braids will try to come apart as soon as you trim the edges.
Then trim off any pieces which are sticking up or unsightly. Be careful not to cut through your stitches.
Trim away any errant thread ends.
And you're done!
I used some different colors with the Union Jack and made it a little larger than Old Glory to get all the detail in that I wanted.


