Showing posts with label England. Show all posts

Monday, November 19, 2012

Waxing Poetical on Wisteria

Soon I'll be posting the second entry in the showcase of projects my husband completed recently. But first, would you like to hear the long story behind it? Of course you would. If not, scroll through to the next post.

My Wisteria and Rose Bouquet
Have you ever been to the Albuquerque Botanical Gardens? (See, told you it was a long story.)  If you have, you probably would not forget the Ceremonial Rose Garden. For those of you who haven't been, the rose garden features a very large arbor covered with the most beautiful and delicate lavender flowers that cascade like grapes. I fell in love with that garden from the moment I first saw it. Everything from the copper roof accents to the gnarly trunks of the vines was beautiful. I decided then that wisteria was my favorite flower (even featuring it in my wedding bouquet, see picture at left).

You may remember we lived in England for a time and I LOVED it. One of the things that England is rightly famous for is the beautiful gardens. I don't know if it's because of the rich soil, the gentle misty winters, or a combination of both.

Case in point: in England I had two rosemary bushes that grew almost like weeds. I trimmed and shaped them like hedges and had plenty of rosemary for cooking. Here, I have unsuccessfully planted and soon after killed two rosemary bushes. Now I have a pathetic sickly-looking one in a pot on my windowsill. That seems to be the only way I can keep them alive. I digress.

Back to wisteria- one of our regular commutes in England meandered through a village. It was not a particularly old or beautiful village when compared to the pristine ones you find on postcards (although those do exist and are marvelous), but it was the sort of village where life continued to plod along. Buildings were more likely to be mended than replaced. When new buildings were added, the most recent being in the late 1970s or early 1980s by my rough guess, they were done so in entire streetfuls so that you had three or four streets full of older houses across from a whole block of ugly apartment buildings. Instead of ruining the older houses, the apartments seemed to heighten their beauty by contrast. On one side, you had an ideal of what, to an American like me, I would assume all of England would look like. On the other, with the apartments, was the stark realization that life progressed. People needed inexpensive housing, just as they do in America, and so the utilitarian housing units were brought in to serve that purpose.

On the side with the older houses, which mind you weren't incredibly old, just old enough to be cute, was one house in particular that was covered with wisteria. I loved that house. In the winter it wasn't much. The vines lay dormant, swirled and intertwined like a Celtic braid. In the spring, the vines suddenly brought forth the most amazing display of light purple and white flowers, completely blanketing the front of the house.

So when we moved here and bought our current house, I started messing with the garden right away. I was determined to slowly but surely transform our yard into a beautiful English garden, complete with a wisteria-covered wall. So finally I purchased a little wisteria plant and put it next to my big empty wall in front of a decorative trellis. It bloomed and thrived, but the poor thing could not attach itself to the wall. Go figure, vinyl siding is not as wisteria-friendly as brick (probably a good thing, too, I can just picture the little tendrils working their way between the panels. So plan B- look it up on Pinterest! My husband and I (he's actually a more avid pinner than I am) both did some research, sketched out our ideas, collaborated, and finally agreed upon a design. Hopefully not long after Thanksgiving I'll be posting what we did.

P.S. Sorry for waxing poetical tonight. This is National Novel Writing Month and I'm forcing myself not to participate because I'm overbooked. All that pent-up literary creativity had to get dumped somewhere, right? 


Sunday, October 14, 2012

2 Paintings of England

Fall Break is Here!

And not a moment too soon! Of course, by Fall Break, I mean I'm doing just one class right now instead of 2. The class I just finished was the hardest, but the most rewarding class I have taken yet. Just 7 more to go! But enough about school and back to the art!

Framlingham Castle Moat

The painting at right is my favorite so far. It's based on one of my pictures. I prefer to work with my own pictures because I usually connect to them better and I can remember some of the details the camera didn't capture. This picture was an outing we took to Framlingham Castle in England. My husband is carrying our daughter on his shoulders as we stroll through the moat.

2 Tips for the Day:

1. Don't feel the need to accurately represent exactly what you see in your source. If that was the intention, it would be photography, not painting (unless you're doing someone's portrait, which is why I don't do portraits- yet). Painting is about artistic interpretation. As the artist, you get to choose the level of detail and what you want to include.

2. A mediocre picture can sometimes make an amazing painting. In the Castle Moat painting, I liked the picture okay, but I LOVE this painting, which is really saying something for me. My reactions to my own work usually range from loathing to indifference, it's rare that I really love something I've done.

So here's the painting once again. If seeing my source photo would absolutely ruin it for you, don't keep scrolling! (Or scroll really fast to the next painting!)


And here's the next one (I really need to think of names for these things!) Can you tell the difference between the top and bottom pictures? I tweaked it just a little and signed it.


 In case you were looking REALLY closely, you might notice my brand new easel (a birthday present from my sister!) in the top photo. That's probably the cleanest it will ever be. For what I changed on the painting: added light green in the top center leaves, added light green on the lower right leaves, added lighter colors to the gravel. And here it is next to the source photo, a picture I took from the window of a tea party in England.


Here are four of my other paintings grouped together:
In other news, I've been asked to teach a painting class for a women's group this month. They've had such an overwhelming response that we are offering the class on a second night! I'm quite excited to be teaching and encouraging others to branch out and try new things.

Saturday, September 22, 2012

More paintings!

I'm supposed to be doing homework, but I thought I'd take a few minutes to share what we've been up to. Since I've been in school, I've really needed a way to relax one night a week. Doing landscape paintings has become my outlet (for now, I change artistic directions fairly often). I don't really have any great techniques to share, but I have a few tips:

1. Get a buddy and an honest critic. My sister is my painting buddy. We never paint the same picture (other than our first ones because we did a class together), but we usually pick something in the same genre and size. Having her here pushes me to do better and keeps me accountable to finish my work. My husband is the critic. He tells me what needs to be fixed and what looks good. He's nice about it, but he doesn't hold back.

2. Find a size that works for you. I bought a value pack of 12" x 12" canvas. The size is large enough for me to do a decent painting on, but not so large that it takes more than one sitting to finish. Perhaps one day I'll tackle something bigger. For now, it's nice to focus on technique.

3. Just past the "I hate it!" phase is the "Hey, that's not so bad" phase. If you hate, keep going until you're satisfied with it (same thing goes when writing a novel).

4. Check out sales and wholesalers. I was able to snag some canvas at a really good price from an art store I don't normally go to. And a friend of mine recently introduced me to a discount supply store that had amazing brushes for 25 and 50 cents apiece!

And that's it! Over time, you'll get better and better. In the meantime, you'll relax and have a great time. That's all for now, I really need to get back to writing my paper.


Friday, July 6, 2012

Union Jack Miniature Rag Rug

Do you know what happens when you watch Doctor Who while making an American flag rag rug? You begin to look around and think, hmm, look at all this extra red, white, and blue I have laying around. The American flag turned out pretty well. Ooh! A Union Jack! That would be more of a challenge. Let's do it! 

Now sometimes I will show you a craft or a technique that I've made several times and I'm quite comfortable with. Other times, I have no clue what I'm doing and I'll figure it out as I go along. This was one of the latter. I've made rag rugs, and the American rag rug turned out tolerable, I suppose. But the Union Jack turned out to be a fun little challenge. Here goes!


What You'll Need:

(I actually took some measurements this time, so you'll have a better idea of how much you will need.)

  • Red Fabric Rope (about 70 inches)
  • White Fabric Rope (about 98 inches)
  • Blue Fabric Rope (about 98 inches)
  • Red, White, and Blue Thread to match

 1. Make Your Fabric Ropes.

A. Starting Out
For instructions on fabric ropes, check out my Rag Rug Basics post. I've been playing around with a different way to start the braid, so I'll share that with you now.

1a. Alternate Start Method.

 A. Cut fabric into 1" (ish) strips. Cut a small slit into each end of each strip. Lay out your first three strips as shown at right.

B. Stacking


B. Stack two of the strips, making sure to align the slits.


C. Thread the third strip through the other two.


D. Thread one end of the third strip through the slit on the other end. 

E. Continue to pull the end through until the loop is closed. 

F. Begin braiding like normal.
 G. See how nice it looks? Easier done than said, right?


1b. Alternate End Method.

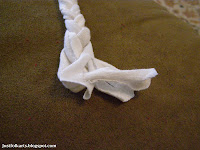
Cutting slits in ahead of time also makes it really easy to tie off an end, either when you're completely finished or just need to take a break.
 At left is a picture of the end of the braid.
 Simply pass the left piece (helps if it's the longest) over the center one and thread it through the slit on the right piece.
 And pull tight! This can be easily undone to add more if necessary.


2. Cut the pieces. 

In my American Flag Rag Rug post, I discussed how to use thread to tie off the ends of the strips we're using. I did make the fringe that extends past the thread longer on this one and it helped.

From the red rope I cut:
  • 1x 24" length
  • 2x 9"
  • 4x 7"
From the white rope I cut:
  • 4x 10 1/4"
  • 8x 7"
I cut the blue as I added it to the rag rug. Since it was the last color added, the pieces varied in size.

3. Make St. George's Cross.

We'll be starting in the middle with St. George's Cross (the vertical and horizontal red one). First, fold the 24" piece in half and using a catch stitch or a whip stitch, secure the halves together. The whip stitch is easier, but will show more of your thread on the reverse. Fold each of the 9" pieces of red in half and stitch together as well. Be sure to keep your work flat as you go.
Preparing to attach the shorter pieces.

Using a whip stitch, attach one end of each of the shorter pieces to the middle of the longer piece. 
Laying out the white pieces.
Lay out (and pin, if you wish) the 4- 10 1/4" white pieces so that they are parallel with the ends of the red pieces and form a sharp 90-degree corner at the intersection of the red pieces. Sew them in place.
Sewing in the white around St. George's Cross.

 4. Make St. Patrick's Saltire.

Now we'll be working on the diagonal red and white pieces. Lay out the remaining red pieces as shown below.
Starting on St. Patrick
 Then lay out the remaining white pieces so that each diagonal red piece has a white one running parallel to it on either side. It may help with the corners to trim the ends of the white pieces diagonally, as shown below.

Trim the ends.
 Secure the parallel white and red pieces to each other.
About to sew St. Patrick to St. George

Then sew the ends to the corners of the white pieces on St. George's cross. Extra points for authenticity if you can make the correct thicknesses and corner alignments. Since I knew this Union Jack was going to be claimed by a certain 5-year-old, I didn't stress too much about it. 
Securing the Diagonals

 5. Make St. Andrew's Cross.

Now we'll be adding in the blue, one strip at a time. First, attach a strip of blue parallel to each of the diagonal white strips.
Adding the Blue
 Then add a shorter strip parallel to each of the vertical white strips.

And add a blue strip parallel to each of the horizontal white strips. 
 Due to variations in thickness, just the strips I mentioned filled up one blue "pie slice" of my Union Jack.
 Where necessary, add another blue strip folded like a V. You may need to be creative with the stitching and cornering. This is where using T-shirt material comes in handy. It stretches, doesn't fray, and is quite forgiving with the bends.

6. Trim the Edges.

If your rug turned out a little crooked, or if it won't lay flat, don't trim the edges yet.  Soak it in water, then lay it flat, using weights if necessary to flatten it out. Once it's dry, continue with trimming.

Use a ruler and a pencil to mark the edges you wish to cut.

Use heavy duty scissors to cut off the ends. Then sew the edges using an overcast stitch. This part might be a little tricky as the braids will try to come apart as soon as you trim the edges. 
 Then trim off any pieces which are sticking up or unsightly. Be careful not to cut through your stitches.
 Trim away any errant thread ends.

 And you're done!


 I used some different colors with the Union Jack and made it a little larger than Old Glory to get all the detail in that I wanted.